You’re asking yourself, “What is a Facebook pixel?” Maybe you’ve heard of Facebook pixels in Facebook groups you’re in or your business manager mentioned it to you.
Pixels are super helpful for businesses to help them track new customers and get sales. This is an invaluable free tool you need if you’re using Facebook for your business.
Today, you’re going to learn about what a Facebook pixel actually is, how to get started with Facebook pixels, best practices, and more.
Let’s dive in.
What is a Facebook Pixel?
According to Facebook, a Facebook pixel is an analytics tool that lets you effectively measure your advertising, helping you get to know your audience and understand the actions they are taking on your website.
The pixel is important because it can help you show your ads to the right people.
Think about it.
Imagine you went to the mall and stepped inside a cell phone accessories store. You walked around, looking for a case for your phone but ended up leaving without buying anything.
Then, you saw an ad from the phone store showcasing their newest products or advertising a sale.
Because you’ve already visited the store, you’re more likely to purchase than someone who hasn’t visited or may not be in the market for a new case. And if you buy, the push that made you make the purchase was being exposed to the store a second time.
That’s kind of how the pixel works.
When a visitor lands on a website, they’re tracked and that information can be used to serve them ads.
The tracking can get pretty in-depth and look at how a visitor interacted with your site, including if they joined a mailing list, added products to their shopping cart, and more.
You can see how important this can be for businesses to attract customers and get sales. The pixel plays a major role in this.
How does the Facebook pixel work?
After the Facebook pixel is set up, it fires when a website visitor takes an action on the site, like entering a term into a website’s search bar, landing on specific pages, and more.
The pixel receives these actions and provides you access to view the data, so you can decide how to use that information to reach those customers again.
You can view all the pixel data from the Events Manager on the Facebook pixel page.

Why You Want to Set up a Facebook Pixel for Your Business
The Facebook pixel helps you better identify your audience. It helps you create better ads tailored to the right people who are interested in what you’re offering.
This aids in helping you increase your traffic and make more money for your business.
Whether you’re using Facebook for your business now or not, it’s still a good idea to install a Facebook pixel.
There are so many ways to use Facebook for free and paid marketing as a low-cost way to spread brand awareness, steer traffic to your website, and market your business. Facebook is good for lead generation, growing an email list, plus many other ways it can benefit your business. Whatever business you operate, it will gain from having a presence on Facebook.
While you’re deciding if you’ll try Facebook ads, the pixel is working hard in the background, collecting customer information for you. Then, when you’re ready to pull the trigger and launch a Facebook ads campaign, you’ll have the pixel data ready and waiting.
If you’re not using a Facebook pixel, you’re really missing out.
How to Use a Facebook Pixel
As I mentioned, the Facebook pixel is quietly working in the background, collecting valuable customer information to help you increase your ROI and serve the right audience.
You can use the pixel across your entire website or just on specific pages. You can even use two different pixels on one site if you need to.
There are two ways to use the Facebook pixel:
- For different standard evens
- For custom events
Standard events are predefined and include:
- Add payment info: Payment information is added
- Add to cart: An add to cart action takes place
- Add to wishlist: Someone adds something to their wishlist
- Complete registration: Registration is completed
- Contact: A contact form entry/request is made
- Customize product: A product is customized
- Donate: A donation is made
- Find location: Someone searches for and finds a location
- Initiate checkout: The checkout process is started
- Lead: The customer submitted their information for contact
- Purchase: A purchase is made
- Schedule: Someone scheduled an appointment
- Search: Someone searched for something on the website
- Start trial: A trial has been started
- Submit application: An application was submitted
- Subscribe: Someone subscribed to a mailing list
- View content: A page visit
These events are actions that can take place on your website, and your Facebook pixel can measure each of these.
There are also custom events, which let you get a specific action measured that’s not on the list above, like Purchase Completed, for example.
With both standard events and custom events, you can really drill down and get super specific on the type of action you want to measure.
This means you can tailor it to suit your needs, like if you want to group two kinds of customers into different categories, like women’s petite apparel buyers versus women’s maternity apparel buyers.
Now that I’ve gone over the pixel a bit, I hope I’ve sold you on it because it’s incredibly valuable – and it’s free.
In my eyes, you can’t lose. Here’s how you can create and install your Facebook pixel.
How to Create and Install a Facebook Pixel
Creating a Facebook pixel is pretty straightforward. This process should take you less than five minutes and you’ll need:
- A website
- The ability to update your website’s code
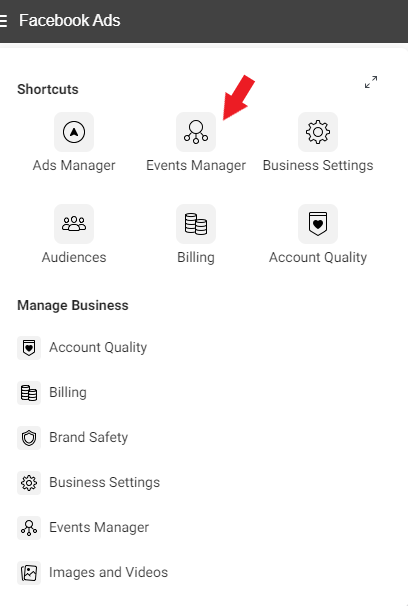
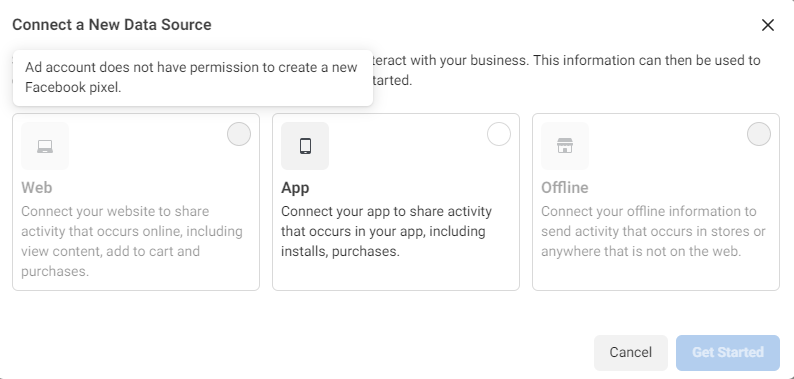
First, go to the Events Manager, which can be found in your Ads Manager. Then, click Connect Data Sources.

Pick Web.

Next, pick Facebook Pixel and click Connect.
![]()
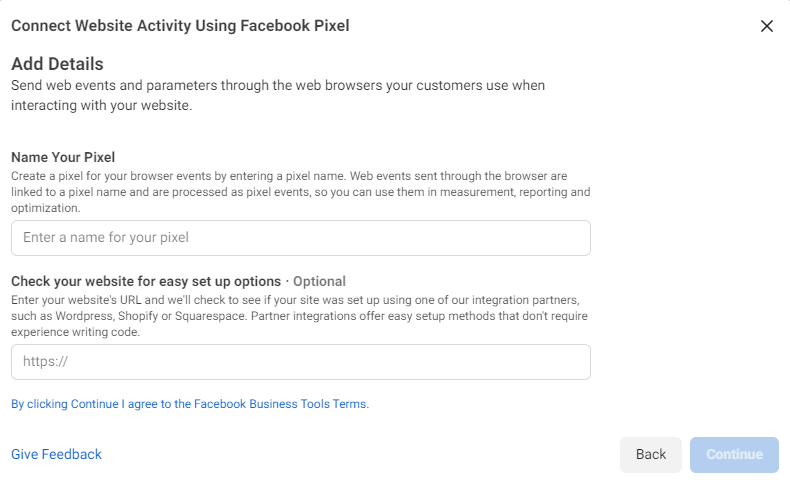
Create a name under Pixel Name and type your website URL.

Click Continue and you’re done.
Boom – you have your Facebook pixel!
The next step is to add it to your website.
There are a few different ways you can add your Facebook pixel to your website, including adding it manually, using a partner integration, or through email instructions.
How to Add the Pixel Manually
Manually adding the pixel is the DIY way to get the pixel on your website. Here are the steps involved:
- Start at the Events Manager
- Select the pixel that you’re ready to set up
- Select “Continue Pixel Setup”
- Install code manually
- Copy the pixel base code
- Find the header in your site
- Paste the base code in the bottom of the header section, above the closing head tag
- Click continue (you have the option to toggle on Automatic Advanced Matching if you so choose to verify the customer information you want to send)
- Lastly, add events using the Event Setup Tool (or you can do it manually)
You’re done!
How to Add the Pixel with a Partner Integration
- Navigate to Events Manager
- Pick your pixel for setup
- Continue Pixel Setup
- Select Use a Partner
- Pick your partner
- Follow the instructions from there to complete the process
Using Email Instructions to Add the Pixel
If you have someone else setting up your pixel, you can choose to email them instructions. To do this, from step 3 above (after you pick your pixel) click Email Instructions, add the email address you’ll send instructions to, and click Send.
How to Set Up Events
Once your pixel base code is installed, the next step is to set up events.
You can set up events in one of two ways:
- Manually installing the code
- Using the Event Setup Tool
Facebook shares step-by-step instructions for setting this up.
When you’re done with this step, just make sure your code is working correctly and you’re all set!
How to Make Sure the Pixel is Working Correctly
To check if events are set up correctly, use the Test Events Tool.
Using the Test Events Tool
Go to your Events Manager. Make sure to keep your Test Events page open, as the tool will only work if the page is kept open.
For website events testing, open a new window or tab.
For app events testing, open your app on your cell phone.
Test out the events. You can do this through your activity on the site, like doing things on the site or app like clicking around, moving across the page, etc.
Your activity should appear in the Test Events Tool.
If it doesn’t, you can go through these steps for troubleshooting.
What is the Facebook Pixel Helper?
This troubleshooting tool is a Google Chrome extension. It helps you validate your pixel to see if it’s functional.
This tool is super helpful to determine if your pixel is installed properly. Once this extension is installed on your computer, it works in the background providing real-time updates to show the number of pixel events that have been triggered.
All you have to do is look at the number that shows up on the Facebook Pixel Helper icon, which shows you the number of pixel events.
Once clicked, it expands to give you a detailed overview of successful events tracked, failures, and more.
Facebook Pixel Best Practices
Here are some top tips for setting up your Facebook pixel as easily as possible.
- Check the accuracy of your base code
- Review the location of your event code
- Review for correct spelling
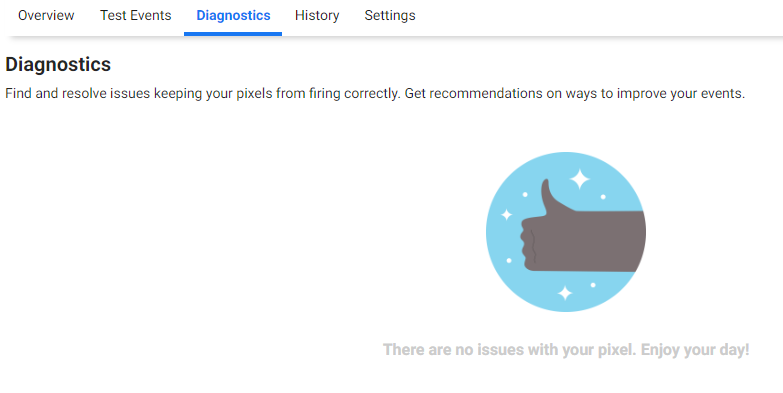
You can also check the Diagnostics tab in your Events Manager to identify and resolve any potential problems.

What is a Facebook Pixel? – The Final Word
Bottom line, a Facebook pixel is a great tool for your business to use. Facebook is a powerful resource that can be used to help drive your company to greater success.
Whether you’re using Facebook ads or not, follow the steps shared above to get a Facebook pixel installed on your website. It might come in handy one day.

Leave a Reply