Interested in Facebook ad manager training? Well, you’ve come to the right place.
This step-by-step Facebook ad manager training guide will walk you through setting up Business Manager on Facebook so you can get to what you’re going to do best — creating ads! This guide is updated for 2020, and will put you on the right path for running ads.
This guide also includes what to pay attention to when creating ads in Ads Manager and our all-time favorite Facebook ad manager training course.
Your 7-step Facebook ad manager training guide
Step 1: Create a Business Manager account
The first thing you need to know is that Facebook has something called Facebook Business Manager. This is going to be your home when you start running ads, and lucky for you, it’s really simple to head on over to business.facebook.com and create an account. You’ll need to have a Facebook account already to create one.

Borrowed with loving permission from Hootsuite
Once you’ve put in your basic details, you’ll be taken to a screen that looks like this. This layout was updated in 2019, and it’s much more intuitive now.

You’ll be able to see your “assets,” which includes ad accounts, pages, and other goodies that are all managed in Business Manager.
Look at you! You’re already on a roll. On to the next step!
Step 2: Pull in your Facebook business page
While this isn’t particularly tricky, a lot of people do get a little confused when they’re pulling assets into the Business Manager. You won’t lose control of the pages, but some things will only be controlled from Business Manager from now on.
Recently, Facebook expanded what you can manage from the backend of the page (where you manage posts and all of that now), but you’ll only be able to manage ad spend and look at (comprehensive) ad stats from the Business Manager.
All you have to do to manage your Facebook page from Facebook Manager is simply click… you guessed it… “Add Page!”

Once you start typing in your business name, it’ll pop up for you to select. If you don’t own the page yourself, just ask your client to add you as an admin to the page. Then it’ll pop up here. And then… “Add Page.” Again, super easy!

Borrowed with love and permission from HootSuite
Related to Facebook Ad Manager Training: Everything You Need to Know About Facebook Ad Specs
Step 3: Time to create (or add) your Facebook ad account
Finally, we have gotten to the real “training” part of our Facebook ad manager training guide. Adding an ad account used to be a kind of complex business, but Facebook has done a lot to try and improve the process.

What to do if you already have an ad account ready:
- Head to business.facebook.com
- Click on the asset you want to manage (if you have multiple pages)
- Click on “Add ad account”
- Click “Add ad account” again
- Enter the Facebook ad account ID. Just click here for a shortcut. (You can find this in Ads Manager by clicking on the dots in the upper right of your business.facebook.com dashboard and clicking on “Ads Manager”)

What to do if you need to create an ad account:
- Go to business.facebook.com to pull up your dashboard
- Click “Add ad account,” and then “create account” — you can name your ad account whatever you’d like, and it isn’t necessary for the name to match the page

- Click “Next”
- You’re done!
Keep in mind that you can only create one ad account per business. This shouldn’t be an issue, but if for some reason someone else needs to run ads for the same business, they’ll need to do it with the same ad account (and payments on file).
Once you have your ad account created, you’re ready to create your first ad! That’s pretty simple too — simply go to business.facebook.com (your BM dashboard), click on Ads Manager in the upper left, and click “create.” Ta-da! You’re about to get rollin’.
We told you this part of Facebook ad manager training was easy! Business Manager might look scary, but it really does help keep the peace (and the transparency) when you work for multiple businesses running ads.
If you want to know more about creating, designing, and managing actual ads in Facebook’s Business Manager, we have some lovely resources for you for that, too. We like to overachieve.
- 7 Examples of Great Facebook Ads (And What Makes Them Great)
- Your Complete Guide to Running Real Estate Ads
- What Is a Good CTR for Facebook Ads
Step 4: The Facebook Pixel setup
This step is technically optional part of Facebook ad manager training, because you don’t need to set this up to run a successful ad. BUT, you’re missing out on free data if you forego this, so it’s worth setting up and getting to know. The Facebook Pixel is a brilliant little bugger and you should take advantage of it.
This tiny little piece of code is as easy as creating one and adding it to your website. You can create 10 different Pixels per Business Manager, so get creatin’.
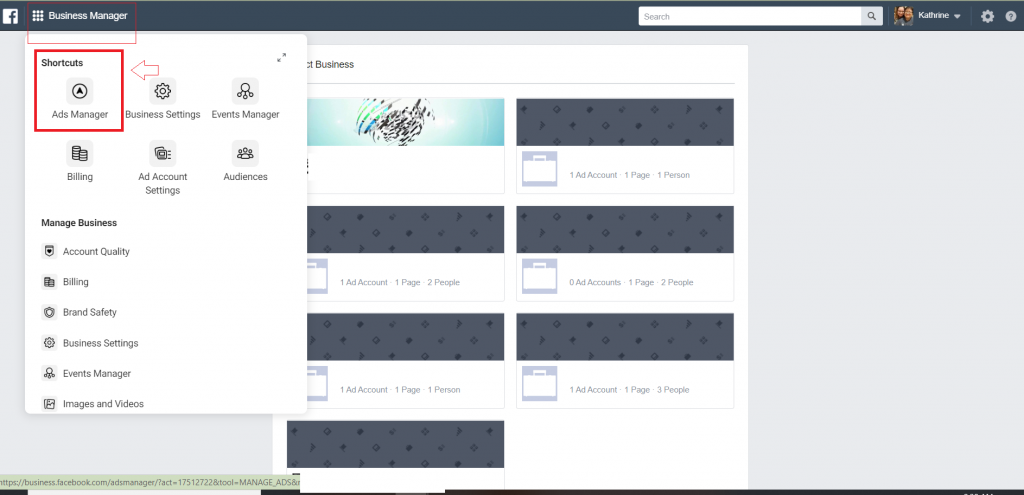
First, head on over to “Events Manager,” which can be found under your shortcuts in Business OR Ads Manager.

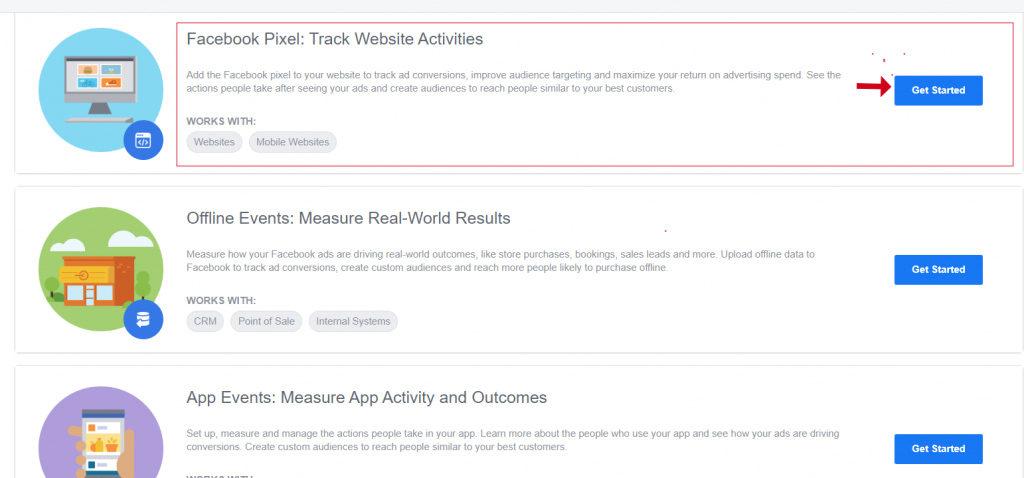
Once you’re there, just find the part where you can manage Pixel Data.

If you click on “Get Started,” this will pop up.

Enter your data for your Pixel (which can be anything) and continue.
Tackling how and when to use the Pixel is a different blog… course… novel in and of itself, but playing around with how it works won’t cost you anything but an afternoon and a few cups of coffee, so go check it out and see what you can find.
Step 5: Secure your Facebook Ads Manager
Depending on your spending, what you do, and how secure you want to be, you have the option of securing your Ads Manager in less conventional (but hopefully not soon) ways.
You can set up a few different types of security, but they are all based on something called Two-Factor Authentication. You can choose to authenticate via Text message, code generator, or a recovery code, with the code generator being the most interesting one of the bunch (and probably the most secure). Make sure you require 2FA for everyone if you do it!

Step 6: Add your payment method
While we don’t think this is optional, it is optional before you actually run an ad. You can do this in Facebook Business Manager, too, but there are a few requirements:
- You must be an admin of the ad account you are managing.
- You must use an accepted method of payment for your ads.
- You SHOULD know that Facebook will charge you on a rolling budget with an increase in the time between charges as you continue to run ads. At first, you will be charged after you spent ten bucks. Then $25, $35, and so forth.
Head on over to “Ad Account Settings” and then “Billing.”

This will tell you when your next bill is, how much you owe, and if you have any billing methods on payment yet. It also allows you to set your account spending limit if you so choose. Or you can totally let it run free as the wind, it’s up to you.

Click “Add Payment Method” once you’re done looking at everything here.

Hit “Continue.” And you’re done! Your method of payment will be charged regularly so make sure you’re bringing in the moola to pay it.
Step 7: Create a business asset group
This is a fairly new thing because BACK IN OUR DAY (*cough*) you just had to add people to these assets individually. Now you can add assets to a group. The assets you can add to a group are:
- Pages
- Ad accounts
- Pixels
- Instagram accounts
- Offline events
- Catalogs
- Apps
- Custom Conversions
This kind of cut down on the messy “Did I add you to the ad account or just the page, Janet?”


Thanks again, HootSuite. You the bomb.
Select all of the assets you want to add to your group.
Choose who should see your group’s assets (you can add more people later! That’s actually kind of the point, but we digress).

Ta-Da! Now you don’t have to worry about all of those pesky permissions. Just add someone to the group and they’ll have what they need to kick ass.
What to pay attention to when designing ads in Facebook Ads Manager
What’s popular and what’s not
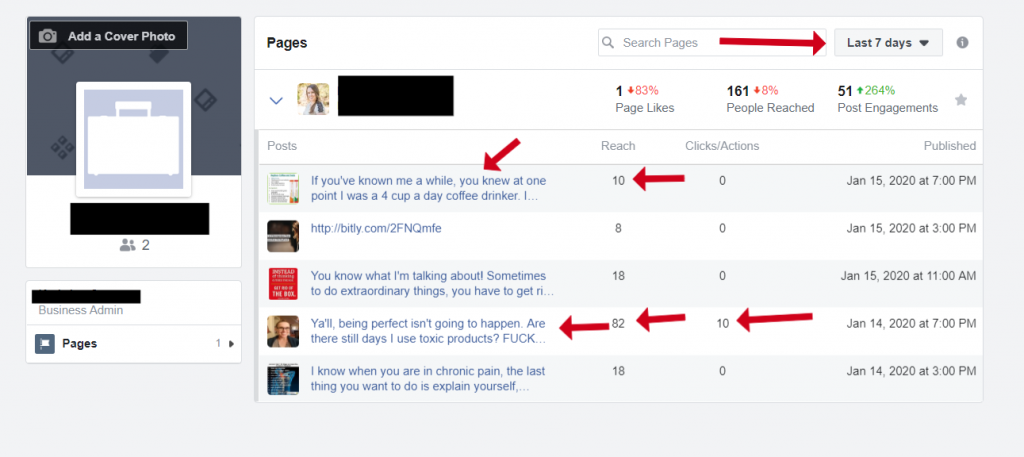
Once a page is added to Business Manager, you get a pretty neat feature and are able to see the interaction levels of your posts on your page.
This is awesome because it gives some quick n’ dirty insights into what is working and what isn’t, and gives you an opportunity to get to know your audience a little better. What works? What resonates? When your ads are not succeeding, this is a great tactic to see if there’s something you can do differently that would work better.

Obviously, the use of curse words was appreciated in this more popular post, so we should use them more often.
… maybe not the takeaway, but you get the point. Stats are good!
The sheer volume of targeting objectives
Your eyes should get wide here because there are literally thousands of audiences you can reach out to.
This doesn’t include custom audiences. This doesn’t include data you’ve collected via the Pixel. This is just what Facebook has to offer advertisers when they go to create an ad.
You can reach out to people who like pages, or certain things, or post a lot, or don’t post at all. You can reach out to income levels, zip codes, cities, people who own rabbits, people who hate rabbits, people who may be thinking about buying a rabbit (don’t do it Susan, Jenny won’t take care of it and you’ll have to do it instead).
It’s a lot. We break it down for you some in our course and give you some direction, but know that no matter what, it’s a lot. And you’ll have to learn a lot about your audience. It’ll be creepy, but fun. We promise at least one of those things will be true.
Our recommended Facebook ad manager training course
Need a little bit of extra help? We gotchu.
Enter, the Facebook Side Hustle Course
This course will teach you everything you need to know about running Facebook ads for clients or your own business. This is an in-depth course that starts from the very beginning, getting to know Facebook and why it works so well for us, to targeting and testing ads.
There’s also a lengthy module focused on walkthroughs, so you know your ads are set up the right way! And if not, the Facebook Side Hustle Course has an entire section dedicated to troubleshooting.
This is an over-the-shoulder style video course as you watch Bobby Hoyt and Mike Yanda work their magic with Facebook ads. In addition to learning how to run ads, you’ll learn how to find leads, all about client acquisition, and help to niche down your ads.
Is it comprehensive? Yes!
Learn more about the Facebook Side Hustle Course here.
The final word on Facebook ad manager training
We hope you learned a thing or two today about setting up Business Manager, the Pixel, your assets, and more. Facebook ads are an awesome thing for your business or your client’s. And, learning how to successfully run Facebook ads starts with the training you learned today!


Leave a Reply